Universal Connector automates user data imports from your Student Information System into WCM via scheduled CSV file uploads over SFTP — supporting users, groups, memberships, sections, and family relationships.
💡Quick answers
- What does Universal Connector do? Automatically creates and updates users, groups, group memberships, sections, and family relationships in WCM from CSV files exported from your SIS — on a scheduled, repeating basis.
- What connector types are available? User, Group, User-Group Membership, Section, Membership, and Family Relationship — run them in that order since later connectors depend on earlier ones.
- How do I create a connector? Go to CONFIGURE > Universal Connector > New Connector, set the name, type, file name, delimiter, run order, and schedule, then map your CSV columns to WCM fields.
- Is Universal Connector included with WCM? No — it's an optional, for-fee service. Contact Finalsite to set up SFTP access first.
Set up Universal Connector
Create comma separated (CSV) files containing the source data that you transfer to Finalsite servers using Secure File Transfer Protocol (SFTP). When you run a connector, it uses the data contained in the files to update your website.
-
Set up SFTP. Contact the support team to set up SFTP. You receive an email with your username, password, and the name of the site you upload your export files.
* For security reasons, you can only upload files to the FTP server—no file names display. Use an FTP client that displays the 200 response after a successful file transmission. After you transfer files for the first time, support verifies the correct files are in the correct folders. After initial testing, configure automatic FTP.
- Set up passports and assign privileges. After the Universal Connector is active for your site, create or edit a passport with the Manage Universal Connectors extended privilege. Assign this passport to users that are administering the Universal Connector.
- Create and edit connectors. Connectors tell WCM how to use the SIS data.
Create connectors
Create connectors to pass information between your SIS and Web Community Manager.
- Select Universal Connector.
- Select New Connector.
- Type a meaningful name for your connector.
- Select a connector type from the Connector Type menu.
- Select Save.
- Type a file name.
* This is the file you transfer to the FTP server. The file name can be no longer than 100 characters, including the file extension. It can include special characters. After you upload this file to the FTP server, you can select the file name from the menu.
- Select Column header is in the first row, if the first row of your CSV file has headers and can be ignored.
- Select the character that separates data in your file from the Delimiter menu.
* Your options are comma, tab, semicolon, space, and other. If you select Other, type the character that separates data in your file.
- Type a numerical value to indicate when this connector is run. For example, if you type 1, this connector runs first. If you type 6, five other connectors run before this one.
- Type in hours how often the connector runs and select a start time.
* Ideally, schedule all of the connectors to run at the same time. Allow the connector run order control the sequence of execution.
- Optionally, select Delete previously imported records if they are not included in the latest import file. When this is selected all existing records that are not in the latest import are deleted. Most often, it is only used once per school year or once per term.
* Only for User, Group, User-Group Membership, Membership, and Family Relationship connectors.
- Optionally, select Automatically email new users their username and password.
* Only for the User connector.
Map the data
You need to map the source file columns with the Web Community Manager data fields for each connector.
- Map the fields in the Site Manager to those in your import file.
- Column headers: If you have uploaded the source file to the FTP server and you indicated that the first row of the file is column headers, you can use the menus to map the fields—column headers display in the menus. For example, if you are creating a User connector, in the First Name menu select the first name column header.
- No column headers: If you have not uploaded the source file to the FTP server or your source file does not include a heading row, you map each field using the column number of the field in the source file. The first column in your source file is 0 (zero); the second column is 1 (one), and so on.
Section mappings
If you are creating or editing a Section connector, you need to also map where you want to create sections on your site.
- From Edit Connector select Section Mappings.
- Select the site you want to add the section to in the Site menu.
- Type the Identifier in the source file.
- Select a channel from the Choose a Channel menu.
- Select how you want the section to look in the Section Configuration menu.
- Select Save.
Add exceptions
Optionally, add exceptions in the source file you want to ignore.
- From Edit Connector select Exceptions.
- Select Add Exception.
- Select a field from the menu and type a value you want ignored.
- Repeat for all exceptions.
Map passports
If you are creating or editing a User connector, you need to map the passports you want to assign your users. Map a passport for each type of user. For example, parents get Registered User.
- From Edit Connector select Passports.
- Select New Passport Mapping.
- Type a value for the Passport Code included in your source file.
- Select a passport from the Assign Passport menu and select Save.
- Select Save.
Connector types and related data
These are the types of connectors you can create and their data constraints.
User Connector
Create, update, and potentially remove users. This connector can also work along with Lightweight Directory Access Protocol (LDAP).
Group Connector
Create new groups.
User-Group Membership Connector
Assign users to groups.
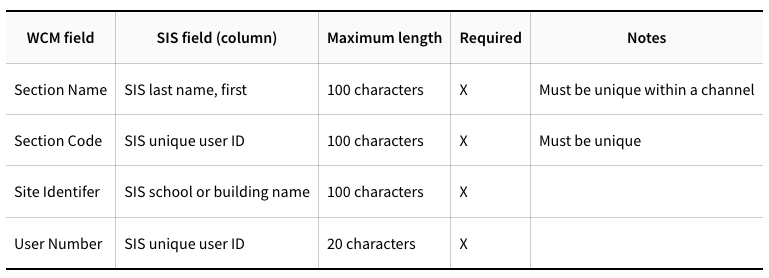
Section Connector
Assign each teacher their own section located under each district’s Staff or similarly named channel.
Edit, delete, activate, and run connectors
Connectors display on the Connectors workspace.
From Site Manager select Universal Connector.
- Select the connector name to edit it.
- Select Delete to the delete the connector.
- Select Inactive to activate the connector or Active to make it inactive.
- View the status of the connector. Green means it is ready.
- Select Run now to immediately run a ready connector.
- Select History to information on the connectors you have run. If any errors occur when running a connector, you see the number of errors.
Connector run order
You can't assign users to groups, teachers to sections, or create family relationships without first creating the user accounts, groups, and sections. Run the User, Section, and Group connectors before you run the User-Group Membership, Membership, and Family Relationship connectors.
Schedule all of the connectors to run at the same time and allow the connector run order that you specified control the sequence of execution.
From Universal Connector select the name of a connector to edit it. Type the Run Order number. Select Save.
Use this order to run your connectors.
- User Connector
- Group Connector
- User-Group Membership Connector
- Section Connector
- Membership Connector
- Family Relationship Connector
Connector notifications
Web Community Manager can send you a completion email when the connectors successfully run.
- From Site Manager select Universal Connector.
- Select Settings.
- Provide an email address the completion email sends from. Select Change and type an email address. Select Save.
- Select Assign Group or Assign User.
- Select the groups or users you want to receive a completion email.
- Type all or part of the group or user name.
- Select Search.
- Select the group or user you want.
- Repeat until you assign all groups or users.
- Select Add.
Select Remove next to a user or group to stop sending them completion emails.